I have tried several methods for dyeing fibre and through trial and error have come up with one that works best for me. In general, dyeing = heat + moisture and this is the beginnings of the perfect recipe for making felt. To avoid this, there needs to be absolutely no movement or agitation of the fibre while it is hot and wet, and a deep, flat oven pan is the perfect receptacle. By laying the fibre out flat you can apply the dye in any way you like, and the fibre remains undisturbed throughout the process until cooled and safe to move.
As always when dyeing, consider your safety and wear protective gloves and work in a well-ventilated area. Use oven mitts and be particularly careful of escaping steam when removing the foil from the pans.
Equipment:
Aluminium roasting pans; aluminium foil; acid dyes; vinegar; measuring spoons; plastic cups; fibre (animal fibres for acid dyes – wool, silk etc.).
I use disposable aluminium trays which are cheap at my local hardware store. They wear out eventually but are good value and are not in danger of being mixed up with trays that will be used for cooking edibles. For the same reason, keep a set of measuring spoons and plastic cups just for dyeing.
Procedure:
1. The fibre needs to be pre-soaked for at least half an hour, up to an hour or more for silk and other fibres that take a lot of time to get wet. Put a drop of dishwashing liquid in your pan (to help wet the fibre) and half-fill it with water. Lay the fibre in the pan and press under the water.
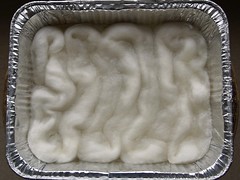
I can comfortably fit 50g of fibre (or 100g of yarn) in each pan – you may be able to find larger ones. Be sure to weigh your fibre before wetting it so you can measure out the right amount of dye. Cramming in too much fibre may mean that the colours do not spread evenly, leaving you with white patches underneath.
2. When your fibre is thoroughly wet, drain off the excess water. The amount you leave in the pan will affect the way the dye spreads: if you press out as much moisture as possible the dye will spread less and stay in patches, leaving water in the pan means the dye can flow around and the colours will blend a bit. I usually pour off most of the water without pressing the fibre, once the dye is poured on it barely covers the fibre and doesn’t move a lot, just enough to blend the edges.
3. Mix up your dyes with water in plastic cups according to the manufacturer’s directions, adding vinegar to the cup if recommended (I’ve used this method successfully for Landscape, Kemtex and Jacquard dyes).
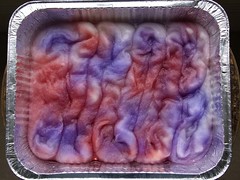
Pour the dye over the fibre according to your desired effect. Laying out tops in a zig-zag fashion makes it easy to make stripes (split and spin the singles to match later for a striped yarn). Pour slowly to get even coverage, the dye will move a little bit from where it’s poured but not much unless you leave in lots of water. You can spread the dye a bit if necessary by pressing with a spoon, but avoid too much agitation of the fibre.
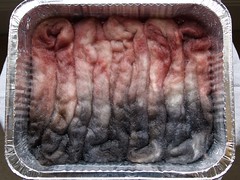
4. Cover the pan with foil and seal the edges. You need to keep the steam in, and you are also protecting your oven from dye spills. Bake your fibre in the oven at 150 degrees Celsius for up to 1 hour.
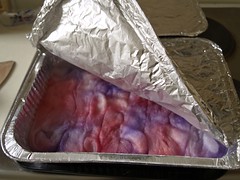
You can check your fibre after about 40 minutes, especially if you have a smaller amount in the pan. Carefully lift one corner of the foil and move the fibre aside. If the water in the pan is clear then the dye is exhausted. If not, pop back in the oven for a while longer. One hour should be plenty for most dyes, if the water is still not clear then the fibre may have taken all the dye it can.
5. Leave the pan to cool completely before moving the fibre. You can remove the foil and carefully pour off some of the water if you like to help it cool faster, but try not to move the fibre.
When cool, rinse with a wool mix such as Eucalan and gently press the water out by rolling up in a towel. Hang the fibre to dry thoroughly before spinning.
Any questions, or did I miss something? Leave a comment. And let me know if you try some dyeing of your own!
 Entries (RSS)
May 28th, 2008 at 10:18 am
Excellent! I’m off to buy trays to try this out. Will let you know how I get on.. :)
May 28th, 2008 at 3:42 pm
*already has trays*
*needs undyed yarn*
I’ve thought of another stupid question, but it’s about using food colouring again so maybe I won’t ask you, you being a clever acid dye person and all.
I’ve going to do blue and brown, anyway, as they’re the least scary colouring pastes I have!
May 28th, 2008 at 3:48 pm
I can pretend to be clever about food dyes too :-)
Is your question whether you can eat the yarn afterwards? I’m pretty sure the answer is no. But you don’t need to use separate trays to your food :-P
May 28th, 2008 at 4:23 pm
That’s fantastic! I’ve wanted to try yarn dying and it’s a method I think I could use. Thank you!
May 28th, 2008 at 6:37 pm
I have been mournfully eyeing some nice dyes and trying to figure out where I’d store the baking trays and plastic cups when I’m not dyeing….
I do like the results you got tho!
May 29th, 2008 at 12:27 am
Great instructions - thanks! And gorgeous roving!
May 29th, 2008 at 12:12 pm
Great tutorial! I want to try this now.
May 29th, 2008 at 3:01 pm
Excellent! I don’t know why I didn’t think of disposable aluminum pans! I have some yarn I need to dye and kept waiting for some steel pots to show up at a thrift store so I could snag them for dying. Now I can get a move on! Thank you. :)
May 29th, 2008 at 7:20 pm
that looks wonderful and easy too, will you follow it up with how the roving looks when it is spun?
May 30th, 2008 at 8:25 am
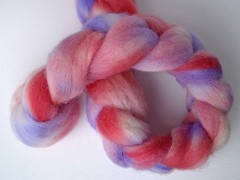
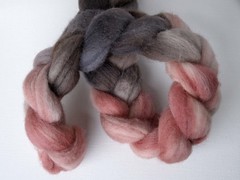
I will with the second one, it’s the Cherry Ripe I dyed up for a fundraiser :-) The pink/red one I’m not so sure - it might end up being for sale.
May 31st, 2008 at 6:56 am
You angel!! I have some pots of dyes and am eager to dye some yarn. This is going to be my method of working too. I just need to get some foil dishes now! Thank you
May 31st, 2008 at 8:12 am
Lovely tutorial, thank you. Just wondering what gas mark to use if you happen to know that would be great, if not I can be less lazy and go look it up somewhere LOL
June 3rd, 2008 at 3:07 pm
Great tutorial, but with our prochem acid dyes, it was recommended NOT to use Aluminum. The acid will “eat” the Al, which may be why your pans wear out faster… Another idea would be to get som deep stainless pans from the kitchen supply… Couse the ones we found would not fit in the oven…
June 8th, 2008 at 7:24 pm
How about glass Pyrex dishes? Just one more thing to hunt for at the thrift store, but perhaps more easily found! (I have Prochem Washfast dyes.)
Thanks for the oven info. I’ve been wondering about the success of color and wash fastness when using an oven. Would it be any different than using the stove?
June 9th, 2008 at 8:34 am
Yes, pyrex would probably work as well, harder to get hold of though. I’ve been keeping an eye out in the charity shops.
I can’t imagine that the washfastness would be different, it’s only application of heat after all - same as on the stove. I’ve never had any problem with oven-dyes running.
July 14th, 2008 at 3:48 pm
Oh THANK YOU! :)
I’ve been poking around ravelry for 2 days now, trying to find clear instructions on oven dying, and couldn’t seem to find any solid information. (mainly, is there water in the pan, I thought surely there HAD to be, but couldn’t find the info)
So thank you for this great tutorial! I’m cheating and using food coloring ;) but this was so helpful!
July 14th, 2008 at 3:54 pm
ps. ignore my inability to spell ‘dyeing’ above :) of course I’d notice it after I posted it.
July 17th, 2008 at 12:51 pm
OK, I think you posted this during my “offline period”, so I’m only just now seeing it, and wishing I had spotted it sooner. How fabulous! I’ve justed dyed a bunch of roving, and it’s not REALLY felted, but the texture did change a bit through the process, and it might not be quite as nice to spin now. Next time I’m trying it your way! In fact, I might have to go put in an order for some fiber and a few more dye colours right now. :-)
I love the idea of the disposable pans. I’m thinking if the only problem with using aluminum is that the acid will eat away at it, that doesn’t really matter much with a disposable pan, right? I mean, you’re not planning to keep it forever. :-)
September 9th, 2008 at 12:13 pm
Love the website and have just used this method of dyeing. I found it much easier than stove top and have lovely results drying on the line. Thanks
September 23rd, 2008 at 5:28 pm
Hello,
I just used this method for my first dyeing project ever. The fiber is sitting in the still-warm pan at the moment. Apparantly I used way more dye pigment in it than I needed, because the water is still colored after the full hour of baking. What should I do in this case? Just rinse the extra dye water down the drain?
Thank you so much for posting the tutorial. I had lots of fun with it!
February 22nd, 2009 at 9:58 pm
I can’t wait to try this - although Trev has claimed dyeing responsibilities - since this appeals to the “artist” in him!
How to I turn the fibre into a pretty plait? Would be handy for storage :)
February 3rd, 2013 at 1:46 pm
just click the following web site…
Needles on the Move » Oven Dyeing…
April 27th, 2013 at 2:38 pm
Cherie…
Needles on the Move » Oven Dyeing…
May 11th, 2013 at 11:57 am
Full Guide…
Needles on the Move » Oven Dyeing…
May 16th, 2013 at 8:31 pm
Rafael…
Needles on the Move » Oven Dyeing…
May 23rd, 2013 at 2:12 pm
More Signup bonuses…
Needles on the Move » Oven Dyeing…