I have tried several methods for dyeing fibre and through trial and error have come up with one that works best for me. In general, dyeing = heat + moisture and this is the beginnings of the perfect recipe for making felt. To avoid this, there needs to be absolutely no movement or agitation of the fibre while it is hot and wet, and a deep, flat oven pan is the perfect receptacle. By laying the fibre out flat you can apply the dye in any way you like, and the fibre remains undisturbed throughout the process until cooled and safe to move.
As always when dyeing, consider your safety and wear protective gloves and work in a well-ventilated area. Use oven mitts and be particularly careful of escaping steam when removing the foil from the pans.
Equipment:
Aluminium roasting pans; aluminium foil; acid dyes; vinegar; measuring spoons; plastic cups; fibre (animal fibres for acid dyes – wool, silk etc.).
I use disposable aluminium trays which are cheap at my local hardware store. They wear out eventually but are good value and are not in danger of being mixed up with trays that will be used for cooking edibles. For the same reason, keep a set of measuring spoons and plastic cups just for dyeing.
Procedure:
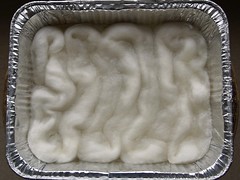
1. The fibre needs to be pre-soaked for at least half an hour, up to an hour or more for silk and other fibres that take a lot of time to get wet. Put a drop of dishwashing liquid in your pan (to help wet the fibre) and half-fill it with water. Lay the fibre in the pan and press under the water.
I can comfortably fit 50g of fibre (or 100g of yarn) in each pan – you may be able to find larger ones. Be sure to weigh your fibre before wetting it so you can measure out the right amount of dye. Cramming in too much fibre may mean that the colours do not spread evenly, leaving you with white patches underneath.
2. When your fibre is thoroughly wet, drain off the excess water. The amount you leave in the pan will affect the way the dye spreads: if you press out as much moisture as possible the dye will spread less and stay in patches, leaving water in the pan means the dye can flow around and the colours will blend a bit. I usually pour off most of the water without pressing the fibre, once the dye is poured on it barely covers the fibre and doesn’t move a lot, just enough to blend the edges.
3. Mix up your dyes with water in plastic cups according to the manufacturer’s directions, adding vinegar to the cup if recommended (I’ve used this method successfully for Landscape, Kemtex and Jacquard dyes).
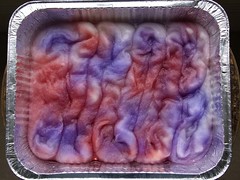
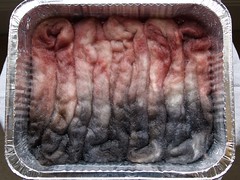
Pour the dye over the fibre according to your desired effect. Laying out tops in a zig-zag fashion makes it easy to make stripes (split and spin the singles to match later for a striped yarn). Pour slowly to get even coverage, the dye will move a little bit from where it’s poured but not much unless you leave in lots of water. You can spread the dye a bit if necessary by pressing with a spoon, but avoid too much agitation of the fibre.
4. Cover the pan with foil and seal the edges. You need to keep the steam in, and you are also protecting your oven from dye spills. Bake your fibre in the oven at 150 degrees Celsius for up to 1 hour.
You can check your fibre after about 40 minutes, especially if you have a smaller amount in the pan. Carefully lift one corner of the foil and move the fibre aside. If the water in the pan is clear then the dye is exhausted. If not, pop back in the oven for a while longer. One hour should be plenty for most dyes, if the water is still not clear then the fibre may have taken all the dye it can.
5. Leave the pan to cool completely before moving the fibre. You can remove the foil and carefully pour off some of the water if you like to help it cool faster, but try not to move the fibre.
When cool, rinse with a wool mix such as Eucalan and gently press the water out by rolling up in a towel. Hang the fibre to dry thoroughly before spinning.
Any questions, or did I miss something? Leave a comment. And let me know if you try some dyeing of your own!









 Entries (RSS)