
Part way through the yoke of my Tangled Yoke I tried it on and made the mindblowing discovery that I had somehow managed to knit the body about 3 inches longer than it needed to be. The yoke was fitting nicely though, and there was no way I was ripping out all that cabling, so I put ‘fixing the body’ on the back burner and finished off the top.
I tossed up a few possibilities: Chop some off the bottom? Cut the middle out and graft the ribbing back on? Rip out the entire body? Ugh. Chopping the bottom off took away too much of the ribbing so I ditched that idea pretty quickly, but I was hankering after option 2 for a while (lazy) until I finished the neckband and did a final try-on.
It was clearly evident that the weight I’ve lost since I started my training was also going to come into play here, I was not happy with the extra ease around the waist, I really preferred the very fitted look I’d seen on some projects on Rav, so I bit the bullet and went for the big chop.
I hope you never find yourself having to cut off a bottom-up sweater at the underarms and re-knit downwards, but just in case you do, I have recorded the process here for posterity.
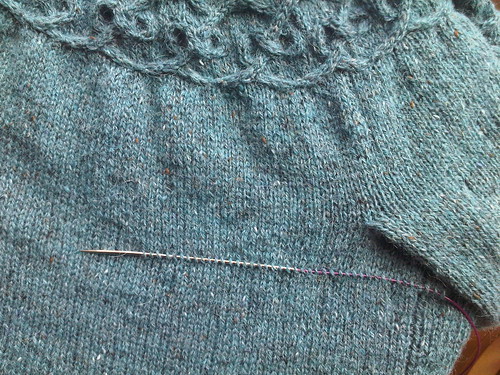
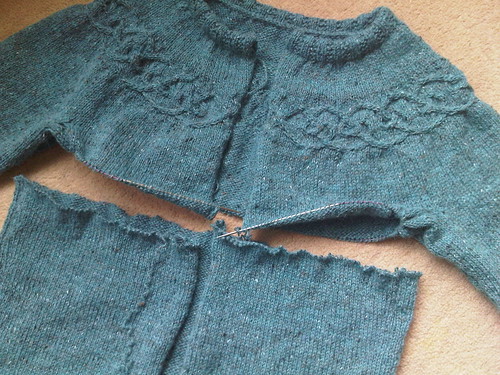
1. Using a much smaller needle, pick up one leg of every stitch of one row all the way around. Be REALLY careful that it’s all the same row. Triple-check it. Do it sober and in good daylight.
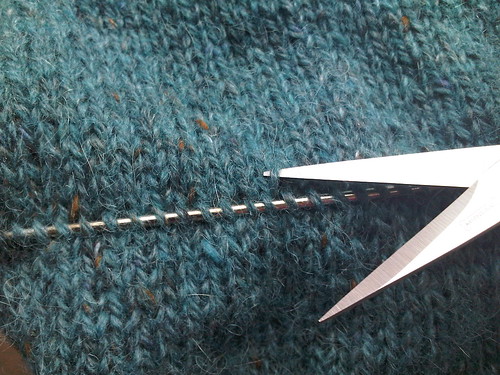
2. Take your embroidery scissors (and a gulp of wine if necessary), and snip stitches in the next row to the picked up stitches. In this case, the row below, as I’m planning to head downwards. Felted Tweed is pretty sticky, so I snipped stitches about 3 inches apart. A smoother yarn will pull out more easily and you won’t need to cut so many.
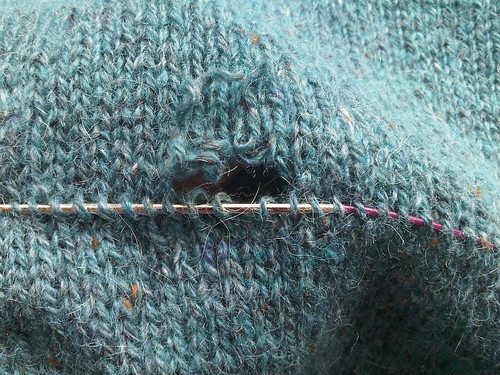
3. Give the knitting a tug and make a hole, you can see that the stitches you want are safely sitting on the needle. Don’t cut too close to the edges - you will need a tail of yarn to darn in once you’ve started knitting again.
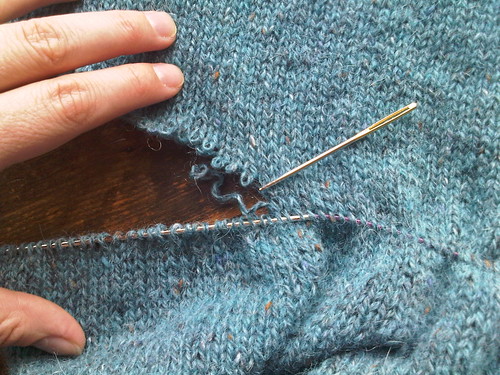
4. Use a big blunt darning needle to pick out the stitches all the way across.
5. Have another glass of wine.
I’m now ready to start knitting down, adding a little more shaping and probably not increasing quite so much at the bottom, as my hips are narrower than my bust. There will be a little jump at the edges when I come to pick up for the button bands, as the stitches now go the opposite way, but I’ll deal with that when I come to it.
Remember! This does not work for ribbing. You can only knit seamlessly in the other direction in stocking stitch. If you wanted to do this to ribbing, knit the new piece up from the bottom and then graft it onto the picked up stitches - they’ll match up perfectly.
It wasn’t that bad, really ;-)
 Entries (RSS)
September 21st, 2009 at 1:28 pm
Oh my, you are a very brave woman!
September 21st, 2009 at 9:21 pm
You’re my hero.
September 22nd, 2009 at 11:24 am
I feel a bit fragile after looking at that! Nice work and thanks for sharing.
I knit my tangled yoke ribbing on smaller needles. Also on the garter yoke cardi (top-down), I did more waist decreases to get to the stitch count for the next size down and then followed instructions for that size.
September 22nd, 2009 at 12:59 pm
Oh My God. You’ve given me the collywobbles just reading that!
September 23rd, 2009 at 12:59 am
Brave Girl.
Maybe that will inspire me to cut the steeks on a vest I made 2 years ago!
September 24th, 2009 at 1:13 pm
wow!
September 24th, 2009 at 8:35 pm
Yikes… it made my knees go weak reading that. A lovely yarn, by the way.
September 24th, 2009 at 10:33 pm
Not that bad, now! Brave woman. But now it’ll fit a whole lot better.
October 7th, 2009 at 5:36 pm
wow! you are one cool customer!
It does look fab though
October 9th, 2009 at 2:24 am
ack! All I saw at first where the pictures, then I read. *L* Very good idea. Waist shaping is a very.very.good thing.